Jekyll2024-08-23T05:44:21+00:00https://blog.nijveldt.online//feed.xmlNiels’ blogNiels Nijveldtniels.nijveldt@xebia.comUse Tailwind instead of bootstrap in your Blazor startup project2024-01-10T09:00:00+00:002024-01-10T09:00:00+00:00https://blog.nijveldt.online//blazor-remove-bootstrap-add-tailwindWhen creating a new Blazor project, by default, it always includes Bootstrap as a CSS framework. This is used for both the layout and component styling. And, of course, this is fine because it’s easy to use and set up, and Bootstrap is still well maintained. But I can imagine that you will probably start from scratch in most cases. In my case, I wanted to start with TailwindCSS, so I created a Blazor starter project with Tailwind.
I wanted to use Tailwind since it’s one of the more modern CSS frameworks as of today. It’s highly flexible and suits well with creating reusable UI components.
However, how does this work with Blazor?
Since Tailwind CSS output is generated based on the classes used in your HTML. There is this fantastic Nuget package called Tailwind.Extensions.AspNetCore, which helps make this work within your Blazor project.
Just follow the steps in the readme, and you are good to go.
I added this additional configuration to make everything work with a .NET 8 solution setup with a Blazor Server and Blazor WebAssembly project.
By doing so, Tailwind will also pull all the classes from components in the Blazor WebAssebmly project.
After that, I removed all other styling and styling sheets from the projects and, one by one, restyled the pages and components with the Tailwind classes. I tried to make it look as similar to the original default Blazor template as possible. The result can be found here: https://blazortailwind.azurewebsites.net/.
The source code can be found here: https://github.com/NielsNijveldt/BlazorTailwind.
Pipeline
I also added a GitHub Actions pipeline, which builds the Blazor Project, compiles and minifies the Tailwind output, and then publishes it to Azure.
For the Tailwind path, I added this script to the package.json.
If you want to develop your application in combination with hot reload, make sure to start the app with “Start without debugging” (or CTRL + F5). Otherwise hot reload doesn’t seem to work. You shouldn’t need to restart your application after creating a component with a newly used utility class since the installed NuGet package ensures it gets added to the CSS output file.
]]>Niels Nijveldtniels.nijveldt@xebia.comTroubleshoot Azure App Service instances for Linux2024-01-02T11:00:00+00:002024-01-02T11:00:00+00:00https://blog.nijveldt.online//switch-instance-azure-app-serviceWe experienced CPU and memory issues with our Blazor application a few weeks back.
To find out what was going on, we needed to create a memory dump to see what threads were causing issues.
When running an application in Azure App Services with a single instance, it’s easy to debug or troubleshoot that instance.
With Kudu, you can find all sorts of debug information.
If that instance has a memory leak or serious CPU issues, then you can open Kudu and go to the Process Explorer page.
From there, you can collect and download a memory dump from the application.
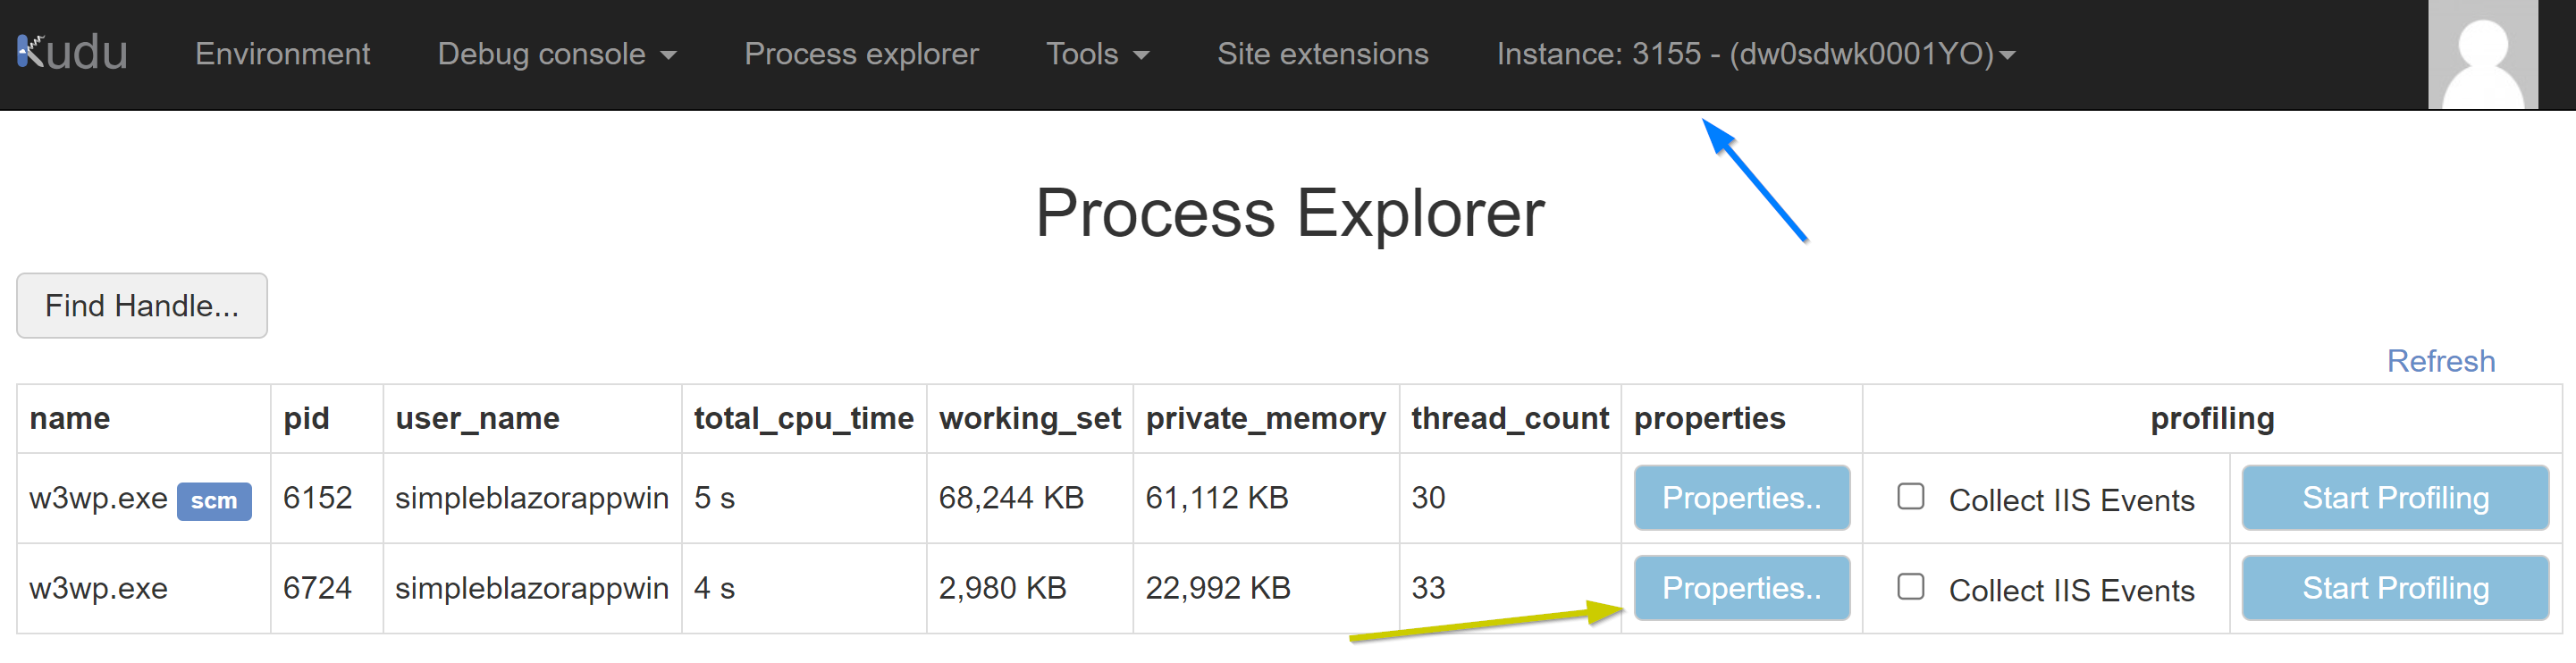
When running multiple instances of your application, this isn’t much harder.
As shown in the image above, you can easily switch between instances. This also includes the familiar name, which can be found in Application Insights.
So it’s easy to navigate from the log or graph, which shows a memory or CPU issue, to the specific instance in Kudu and troubleshoot it.
However, in our case, the application runs on Linux.
For Linux, Kudu has limited UI features to achieve the same thing.
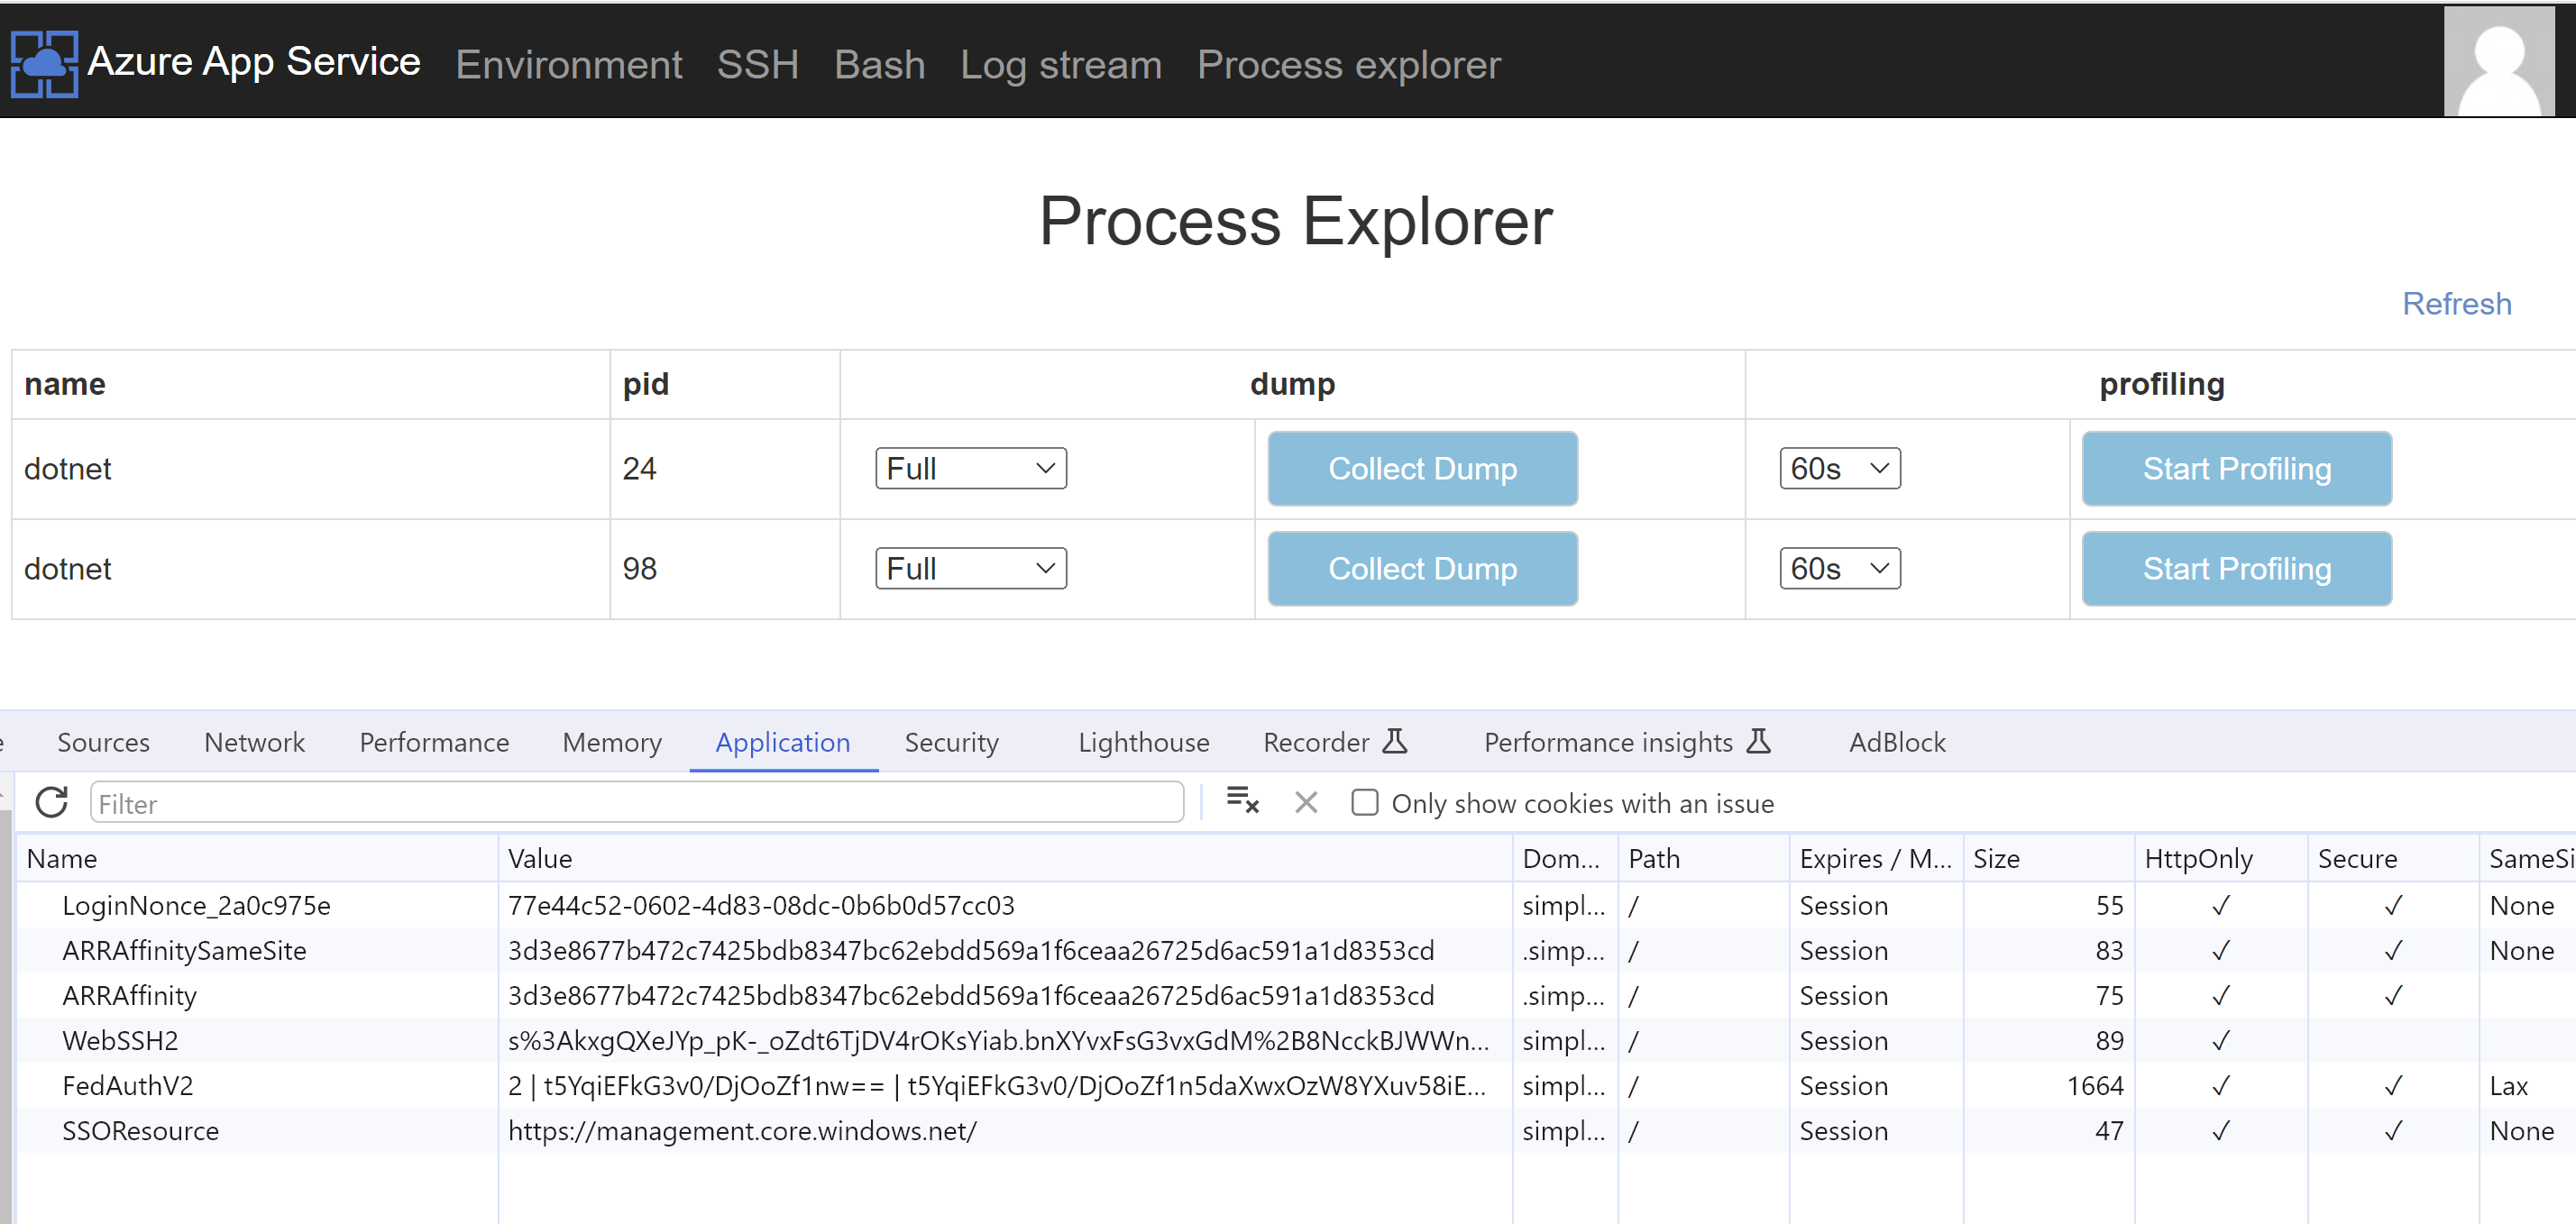
There is no UI control to switch between instances, as shown in the image below.
The hard way is to change the ID in the ARRAffinity cookie to the instance you want to troubleshoot.
But to figure out which id is which instance is a challenge.
There is a way to get a better experience.
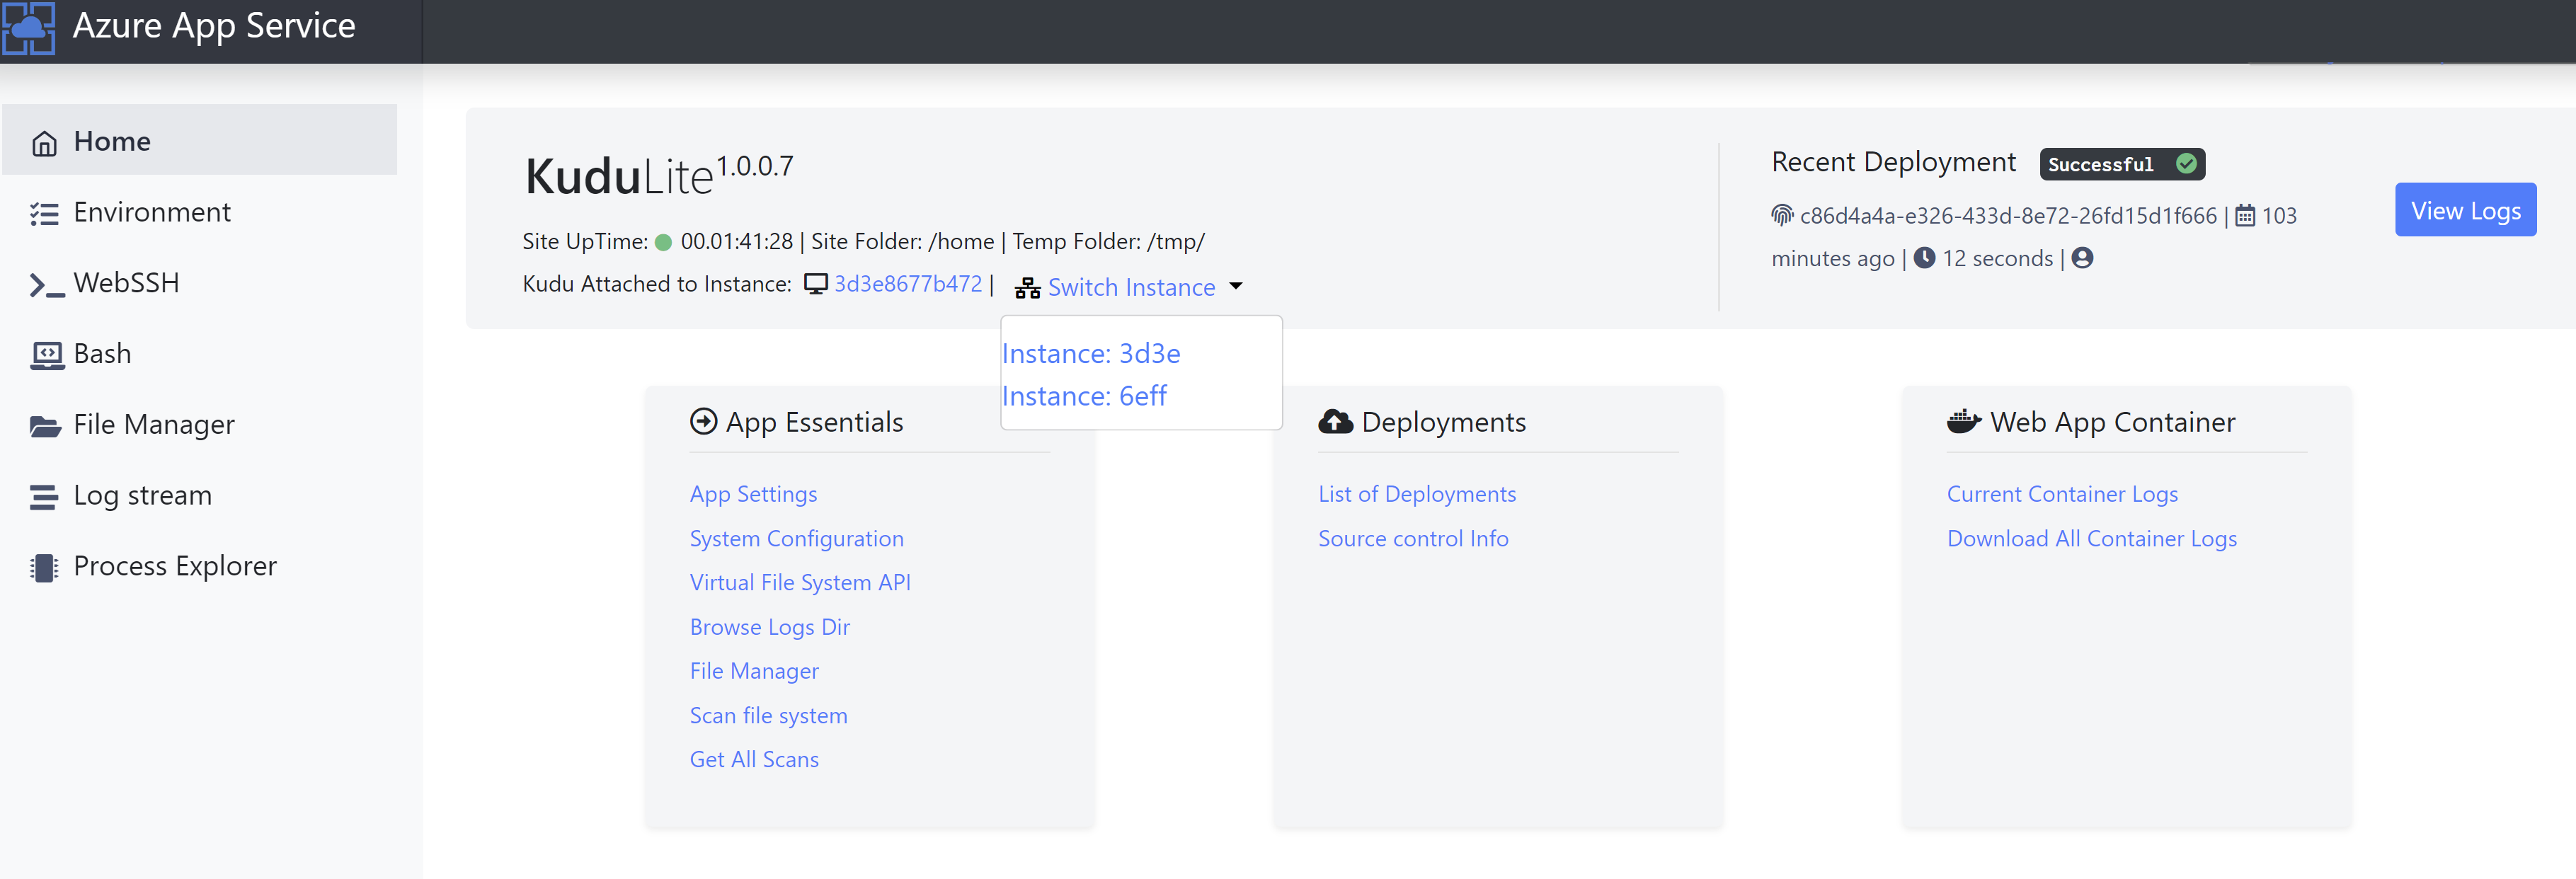
If you navigate to https://.scm.azurewebsites.net/newui (so with /newui appended to your URL) there is this page.
On this page, you find a dropdown to switch between instances.
Unfortunately, the instance name, as shown in Application Insights, is not shown here.
If you navigate to the Environment page, look up the variable called “COMPUTERNAME”; this shows the instance you can correlate to the logs or graphs you use.
After selecting the correct instance, go to the Process Explorer page and press the Collect Dump button.
Make sure to select the proper process; one process is for Kudu, and the other is for your application.
By clicking the i icon, you can find out which one is which.
After downloading the memory dump, you can open Visual Studio and select Open File.
Then, select the downloaded dump, and you will be ready to read it.
If you select one of the “Debug with …” options, you can find the threads that were active at the time the memory dump was generated.
New UI
I could not find any documentation about this /newui and there is also no direct reference from the App Service in Azure.
Too bad the new ui isn’t the standard, as it is more helpful for Linux apps.
There is this older blog, but no follow-up.
Also the version used in that post is still the version of Kudu as used today.
]]>Niels Nijveldtniels.nijveldt@xebia.com.NET 8 and Blazor: A brief overview of What’s New and Improved2023-11-15T19:00:00+00:002023-11-15T19:00:00+00:00https://blog.nijveldt.online//blazor-hosting-typesToday, Microsoft launched .NET 8, the latest version of .NET and ASP.NET.
In this release, Blazor got some significant improvements; in this post, I will provide a brief overview of the update and the new render modes that greatly benefit the creation of Blazor applications.
Download .NET 8 here: https://dotnet.microsoft.com/en-us/download. Don’t forget to upgrade your .NET 7 applications, as the support of .NET 7 is until May 14, 2024, while the new version is supported until November 10, 2026.
Visual created by Dall-E
Render modes
With the previous version of Blazor you had to choose between two hosting models. You could choose between Blazor Server and Blazor WebAssembly. It was not always easy to choose because both have benefits and downsides. You may have experienced inconveniences for both hosting models while implementing specific scenarios.
After the release of .NET 7 Microsoft started a project called “Blazor United” to provide a better experience creating web apps with .NET.
Later on, they renamed it to “Full stack web UI with Blazor”.
With .NET 8, Microsoft offers flexibility with both hosting models. Also, a new solution is provided called Streamrendering.
You can mix and match Blazor Server, Blazor WebAssembly, and Streamrendering to develop a web app that covers all your needs with less or no hacking compared to before.
It’s also possible to choose none of these options. Then the static HTML is rendered without the possibility of interactivity.
StreamRendering
StreamRendering is a solution where a request from the client for a specific page returns an initial response (with placeholders) and allows loading data from a different source. Once the source is retrieved, the placeholders will be updated in this long-running task.
See this simple example:
This example will show a loading indicator on the initial response. At the end of the OnInitialized the response will be updated and finalized. Now, the client will render an overview of products instead of the loading indicator.
This is achieved without a SignalR connection (Blazor Server) or WebAssembly files.
If you have buttons or interactive components, by default, those will not respond to the user’s actions. There are, however, a couple of ways to make the page using StreamRendering interactive. You can use the Enhance attribute if there are forms on the page. See this example. Another way to achieve interactivity is to embed a component as child element with either the render mode defined a attribute on the element or by defining a attribute within the component.
A couple of sidenotes:
The AfterRender and OnAfterRenderAsync override will not be called in your page or component since the cycle is done after the OnInitialized
By choosing “Interactive render mode” as None by creating a new project, you will be able to use StreamingRendering without any of the other render modes
To achieve certain complexity, you might need to use Javascript
Rendermodes
Blazor offers three rendermodes: InteractiveServer, InteractiveWebAssembly, InteractiveAuto.
You can either specify these on component level or page level.
When specifying InteractiveServer SignalR will be used to have an interactive component/page. With InteractiveWebAssembly the webassembly files will be used to render the component/page.
If you choose InteractiveAuto the best option will be used to render the component/page. It will download the webassembly files (if not available yet). In the meantime, a websocket will be started for SignalR to provide interactivity. The next time this same component/page will be opened the already downloaded webassembly files will be used instead of the SignalR connection.
If you choose InteractiveAuto, there are a couple of things to consider.
Because the component’s code can run either server or client side, you need to make sure that the resources (eg, API, Database) are publicly available. Otherwise, the component will break.
The best way to use this feature is by choosing the option “Auto (Server and Webassembly)” while creating a new project. This will create two projects in your new solution. One project to provide the server logic and one (client) project to provide the webassembly logic.
Since the server project has a project reference to the client project you only have to define component and pages once. By placing them in the client project, you can use them in both projects and with both render modes.
Deployment
To deploy the Blazor app, you only need to publish the “server” project. Since it’s a server solution, you need an Azure app service to host it (or something similar outside Azure). If you want to host Blazor WebAssembly as a static web app, pick one of the Blazor Web Assembly project templates when creating a new project. However, none of the render modes mentioned earlier will be available since it’s a Blazor WebAssembly solution.
The upgrade for Blazor is an excellent enhancement of what we already had. It will make it easier to create modern web applications.
For a complete overview of the .NET 8 update, read both the .NET 8 and ASP.NET Core blog posts from Microsoft.
Soon, I will post more content with sample projects, such as Blazor Identity UI, using TailwindCSS within a Blazor .NET 8 solution, and more.
]]>Niels Nijveldtniels.nijveldt@xebia.comSSO on GitHub organization with Azure AD2020-04-02T18:30:00+00:002020-04-02T18:30:00+00:00https://blog.nijveldt.online//sso-on-github-organization-with-azure-adGitHub offers SAML single sign-on(SSO) in the enterprise plan. I created an enterprise account as a trial to see how this works together with Azure AD. GitHub offers documentation to help to set this up, but it’s quite a lot and also some things are not up to date anymore. In this post I will try to explain how to do it and what you could expect of it.
First you will need both a GitHub enterprise organization and an Azure AD. If you don’t have GitHub enterprise, create a free trial for 14 days on this page. Now open both Azure AD and your GitHub organization settings. As the first step we need to create an enterprise application in Azure AD. Click “Add application”, search for GitHub and then select “github.com”. Fill in a custom name or use the default value and create the application. After creation you will see a couple of options. Step 1 is to “Assign users and groups”. Create a couple of users or groups in AD and assign them to this application. By doing this those users will be able to use this connection to sign in to GitHub. Step 2 is to “Set up single sign on”. After opening this you will see a 5 step configuration for single sign-on.
Press edit on “Basic SAML Configuration” and fill in these fields as:
Identifier (Entity ID): https://github.com/orgs/
Reply URL (Assertion Consumer Service URL): https://github.com/orgs//saml/consume
Sign on URL: https://github.com/orgs//sso
Press edit on “User Attributes & Claims” and select the required claim. Make sure the “nameidentifier” claim is set as:
“Email address”
Source: “Attribute”
Source attribute: “user.mail”
Step 3 and 4 contain information we need to configure in the GitHub settings. Also make sure to download the base64 certificate and open the file in a text editor. Now open the “Settings” option in your GitHub organization. Enable the feature “Enable SAML authentication”, after doing this you can fill in the forms based on the information and certificate from Azure. Beneath the certificate field there is a text line, make sure it is set to “Your SAML provider is using the RSA-SHA256 Signature Method and the SHA256 Digest Method.”. You can do this by press the edit button in the end of the line and select both “SHA256” options.
Now click the “Test SAML configuration” button and login with any account with access to the GitHub application in Azure AD. If everything is setup fine you will see the message “Passed: Successfully authenticated your SAML SSO identity”. Now users should be able to go to https://github.com/orgs//sso and login to access the GitHub resources. Even if you didn't add them to the users of the organization. Note that you cannot just go https://github.com/login and login with the Azure AD.
After a user logs in, I would have expected it could access the GitHub resources straightaway. Unfortunately this is not the case. When the user logs in for the first time GitHub asks to create a GitHub account or to login with an existing one. After this a linked identity is added to the account. So will this make sure you only have to be logged in to Azure AD? Unfortunately this is also not true. If you open a new browser and login in Azure AD it will redirect you to GitHub and ask for the password of the linked identity. This feels more like a double sign-on, then a single sign-on.
Group synchronization
Also a feature with the Azure AD connection is group synchronization. I would have expected it to synchronize my Azure AD groups to my GitHub organization automatically. However this is not how it works. For example if you want to grant a specific Azure AD group to a specific repository you need to create a group in the organization and use the “Identity Provider Groups” feature. If you select the dropdown it will show all groups from Azure AD. After doing this you can add this group to the repository. Now users from the AD group will be able to access the repository. In my opinion it would have been better if I was able to select Azure AD groups straightaway. If needed this can also be configured with the GitHub API.
Summary
Overall the single sign-on feature works fine on GitHub and could be used as additional security option. It’s also easy to configure. However some things could be a little bit better. For example the double login and group synchronization feature could be done differently.
]]>Niels Nijveldtniels.nijveldt@xebia.comDeploy GitHub provisioned application to Azure2020-02-11T18:30:00+00:002020-02-11T18:30:00+00:00https://blog.nijveldt.online//deploy-github-provisioned-application-to-azureIn my last post I described how we were able to provision an application into GitHub. The only problem then was there was no API for managing secrets in GitHub. Luckily two weeks ago the API to manage secrets was released. So to finish the setup, I added a script to create several Azure resources, get credentials from Azure and save them as secret in Azure. In the end a GitHub Actions task can use the credentials to deploy the application to Azure.
I added the Create-AzureResources.ps1 which creates a ResourceGroup, AppPlan and a Web Application. This is all done with the most basic settings. Preferably I wanted to use the publish profile of the Web Application since it’s the first mentioned way to use the GitHub Action to deploy a Web App. However the Azure Deploy task does only support XML while the Azure CLI only returns JSON. Another way to pass credentials to the deploy task is by using the Azure Login task in combination with creating an Azure Service Principal. The returned result after creating the service principal needs to be stored as a secret inside of GitHub.
Storing the secret inside GitHub
So when the credentials are generated with the Azure CLI, the next step is to pass the secret to the GitHub API. According to the documentation it’s advised to use LibSodium for encrypting the secrets. The idea is to get the public key for the new created GitHub repository and encrypt the secret with this key with the help of LibSodium. Unfortunately there is no up-to-date(!) PowerShell library of LibSodium, so I had to improvise. To reuse the existing Sodium library I imported the .Net dll and used the exposed methods to encrypt my secret in the same way as the C# example of the API documentation.
So the public key(Base64 string) gets converted to a byte array. Then the SealedPublicKeyBox.Create method from Sodium with the secret (Credentials in JSON string) and the public key (byte array) is used returning a byte array. The byte array then needs to be converted to a Base64 string which can be used in the body to post to the API. Don’t forget to include the Id of the public key!
Deploy
When the secret is stored in GitHub the Action can be triggered. The Action is now updated with the following steps:
After the Action is finished, the application should be deployed to the earlier created Azure resources. The complete code can be found here on GitHub. To summarize the scripts creates the following:
A repository in GitHub
Resources in Azure
Azure credentials as secret in GitHub
Check-in application to the GitHub repo
Triggering GitHub action to build and deploy the application
Add an issue
Add a collaborator
]]>Niels Nijveldtniels.nijveldt@xebia.comProvision GitHub setup2019-12-16T19:00:00+00:002019-12-16T19:00:00+00:00https://blog.nijveldt.online//provision-github-setupThis year I was part of the team that organized the Global DevOps Bootcamp. An important part of the event was provisioning the setup for all teams. This consisted of creating an Azure DevOps project and Azure setup to have a complete pipeline for an application. During the last Xpirit’s innovation day, I researched the possibility of replacing Azure DevOps with GitHub together with my colleague Thijs. In this post, I will share our findings.
Our goal was to create a basic setup inside of GitHub with the use of the GitHub API and PowerShell. We decided the following items should be included in our setup:
Create a repository
Add collaborator(s) to the repository
Add sample code to the repository
Create and start a build based on GitHub Actions
Create and start a release based on GitHub Actions
Raise an issue
Creating the resources
Creating a repository, adding collaborators and raising an issue are really easy to do. Just call the corresponding API endpoints and you’re good to go. The GitHub API documentation is really clear and easy to follow.
From there the repository can be cloned locally and the sample code can be pushed to GitHub. For this part no API call is needed, just regular GIT commands can be used to achieve this. However you might want to get the repository and use the clone_url property to make sure you have the right URL.
GitHub Actions
With the Azure DevOps setup the Azure DevOps API was used to create and trigger builds and releases. However for GitHub there isn’t such an API as it seems. To achieve this it’s possible to add a predefined yml file inside the repository in a specific folder. So in our case we needed to add a yml file inside the /.github/workflows folder. In the yml file we included dotnet build and dotnet publish to create a package. In the end we included the Azure Web app deploy task. This task deploys the sample code to Azure. We could have split up the build part and the release to Azure part, but for the time being we merged them. Obviously the Azure web app could also be provisioned as part of this whole setup, but is currently not included. Both improvements could be the next step.
Secrets
To be able to release something to Azure a secret is needed. This secret should be included inside the repository to be reused and to be safe since it can be encrypted. Also this Azure deploy task uses a secret to deploy to Azure. Then we found out there is no API endpoint for storing secrets inside a repository which is a shame. According to this request more GitHub users need this functionality. While writing this post someone from the GitHub team announced they’re currently working on this improvement, but no release date is given. Of course workarounds can be made, but that was not our goal for this tryout. I will follow this request and update this post as soon as it’s available somehow.
The result
In the end we have made a couple of PowerShell scripts that cover all planned resources. These scripts can be used to provision a basic setup for an application with a pipeline inside of GitHub. Unfortunately it was disappointing that it’s not possible to store secrets and be able to also automate releases to Azure. Altogether it was a lot of fun to work this out and investigate the possibilities with GitHub.
Some things for us to keep in mind:
No secret API available at the moment
Private repositories only allow 4 collaborators to be added
Builds and releases should be done by yml as it seems no API’s are available
UPDATE:
In the meantime GitHub launched the API for managing secrets, read about it in my other post. Also private repositories are now able to have unlimited collaborators.
]]>Niels Nijveldtniels.nijveldt@xebia.comDisplay OpenCover results in Azure DevOps2019-10-30T19:00:00+00:002019-10-30T19:00:00+00:00https://blog.nijveldt.online//display-opencover-results-in-azure-devopsSo with my first post I managed to run OpenCover in the build and measure the code coverage on my .Net API by end-2-end tests. Of course this is fun, but it would be much more of value if we could also show the results somewhere. So in this post I will explain how to update the build to make this happen. In the end the results will be displayed in an Azure DevOps dashboard or SonarQube/SonarCloud.
To get the coverage attached to the build we can use the Publish Code Coverage Result Task. Because this task needs Cobertura or JaCoCo as input we need to make sure we get this output from OpenCover. Out-of-the-box OpenCover is not able to create such a file.
Also the OpenCover result file contains paths to probably folders which don’t exist anymore. So in order to fix that we need to replace the paths to the existing application source on the build agent:
After this is done, with ReportGenerator OpenCover output can be transformed into one of the required formats. (and a lot of other formats) So with this command we can make sure we get the right format:
You could either set the targetdir to a file share or copy the report folder back to the build agent in the end.
ReportGenerator also has to capability to merge multiple coverage files into one file. So if you want to merge multiple test output files into one test result you can use this:
Now we’ve got our Cobertura file (and SonarQube file) we can use the publish code coverage task. Set the Cobertura file as ‘Summary file’ and we are good to go. After running the build you should be able to see the code coverage in the build results. As a final step we can add the “Code Coverage Widgets” to a dashboard in Azure Devops. When configuring this widget select our build and choose one of the coverage measurements. Small blocks will show as number/percentage and larger blocks will show graphs.
SonarQube/SonarCloud
Beside Azure DevOps we can also supply the coverage to SonarQube. Therefore we need to set the ‘sonar.cs.opencover.reportsPaths’ property to the path of the SonarQube.xml created by ReportGenerator. Now the Sonarscanner should be able to upload the file to SonarQube.
For SonarCloud or a newer version of SonarQube you need to set the ‘sonar.coverageReportPaths’ property.
Result
Now code coverage will automatically be updated and published to the desired tool/dashboard. New tests or missing tests will immediately affect the results. By doing this, we avoid the need to publish this by hand and we are always able to get the latest state of coverage for different kinds of tests.
An example of how the pipeline could look like can be found here
If you have any questions, feel free to contact me.
]]>Niels Nijveldtniels.nijveldt@xebia.comIntegrate OpenCover with Azure DevOps2019-10-18T11:00:00+00:002019-10-18T11:00:00+00:00https://blog.nijveldt.online//integrate-opencover-with-azure-devopsOpenCover is a code coverage tool that measures both branch and sequence points for a given .Net application.
In my case, I wanted to measure code coverage of a .Net web API project.
The idea is to start OpenCover, run end-2-end tests (or other tests invoking my API) and generate a coverage file.
This setup gives you insight into how much of your API is covered by, for example, end-2-end tests.
To achieve this, I use OpenCover.Console.exe and attach it to the IIS process of the backend application as described in the wiki of OpenCover.
This works fine for manually starting OpenCover, but in my Azure DevOps pipeline everything should be automated.
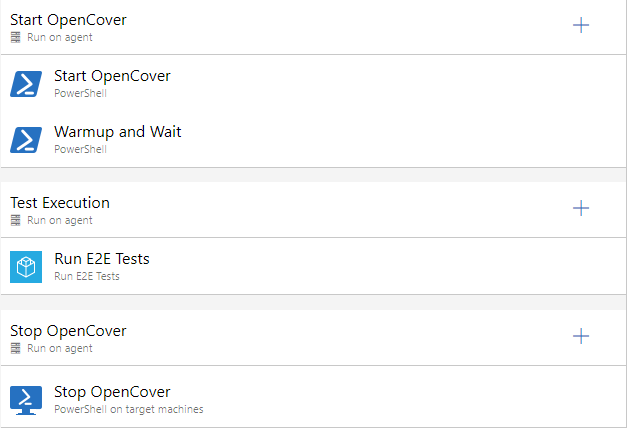
To do so, I created three PowerShell scripts.
One to start OpenCover, one to Invoke the start script on another machine and one to close OpenCover and generate a report.
Starting OpenCover
The start script stops the current running backend IIS application. After it is stopped the actual OpenCover.Console.exe can be started:
Once this is completed the backend application is running again and can be used for testing.
In the Task Manager you will now find two processes for the same application.
It might be useful to perform some warmup for the new running instance of your application.
Starting OpenCover should not be done with remote PowerShell.
Remote PowerShell will start a session, start OpenCover and when the task is finished it will close the session.
When the PowerShell session is ended OpenCover will be killed.
This can be avoided by using Invoke-Command instead with the -InDisconnectedSession parameter:
Note: Be aware that the application will be running as the user running the script.
Stopping OpenCover
After testing is done it’s important to not end the OpenCover process itself but the new w3wp process. If the OpenCover process is ended first no coverage file will be generated after it.
Unfortunately, it’s not easy to find this process since OpenCover doesn’t return any information about that process.
To find the process any way we can use Get-WmiObject to get a process based on a name and command line. In this case the start script used the CommandLine “C:\Windows\System32\inetsrv\w3wp.exe” -debug
So in the second script the right w3wp process is searched for and when found the process gets killed. Now OpenCover will generate the coverage file after a couple of seconds. In the end the backend IIS application can be started again in IIS like it was initially running.
Pipeline
Both scripts can be used inside an Azure DevOps pipeline with a test execution in between. When OpenCover is stopped correctly, the generated result(xml) can be used for reporting. More about this subject will be covered in my next post. Stay tuned!
The scripts can be found on my GitHub.
Feel free to ask questions!


 Visual created by Dall-E
 Photo by Shane Avery on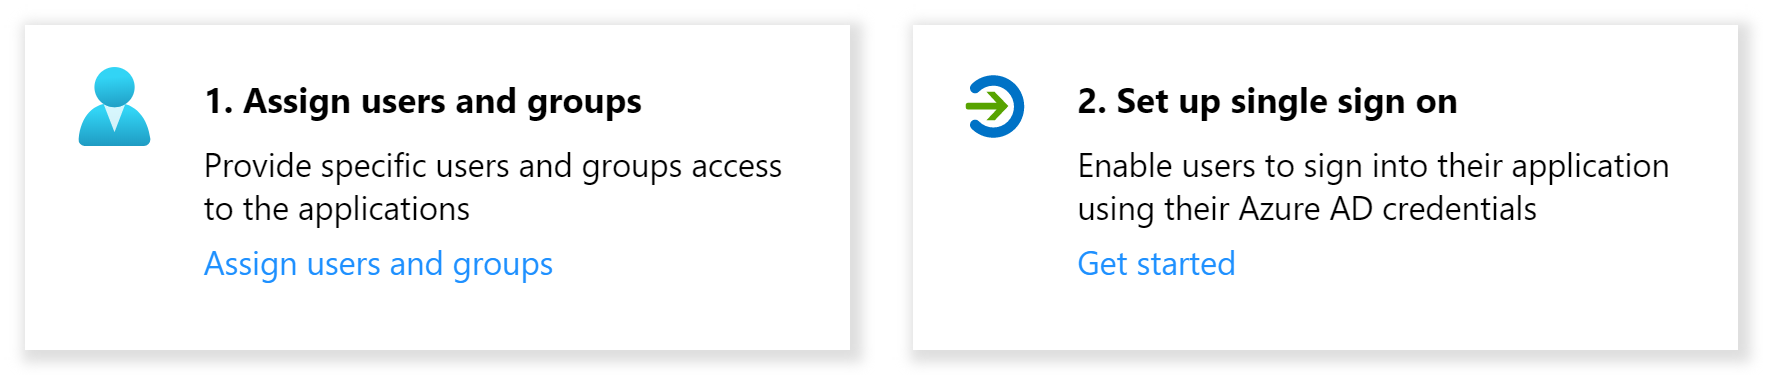
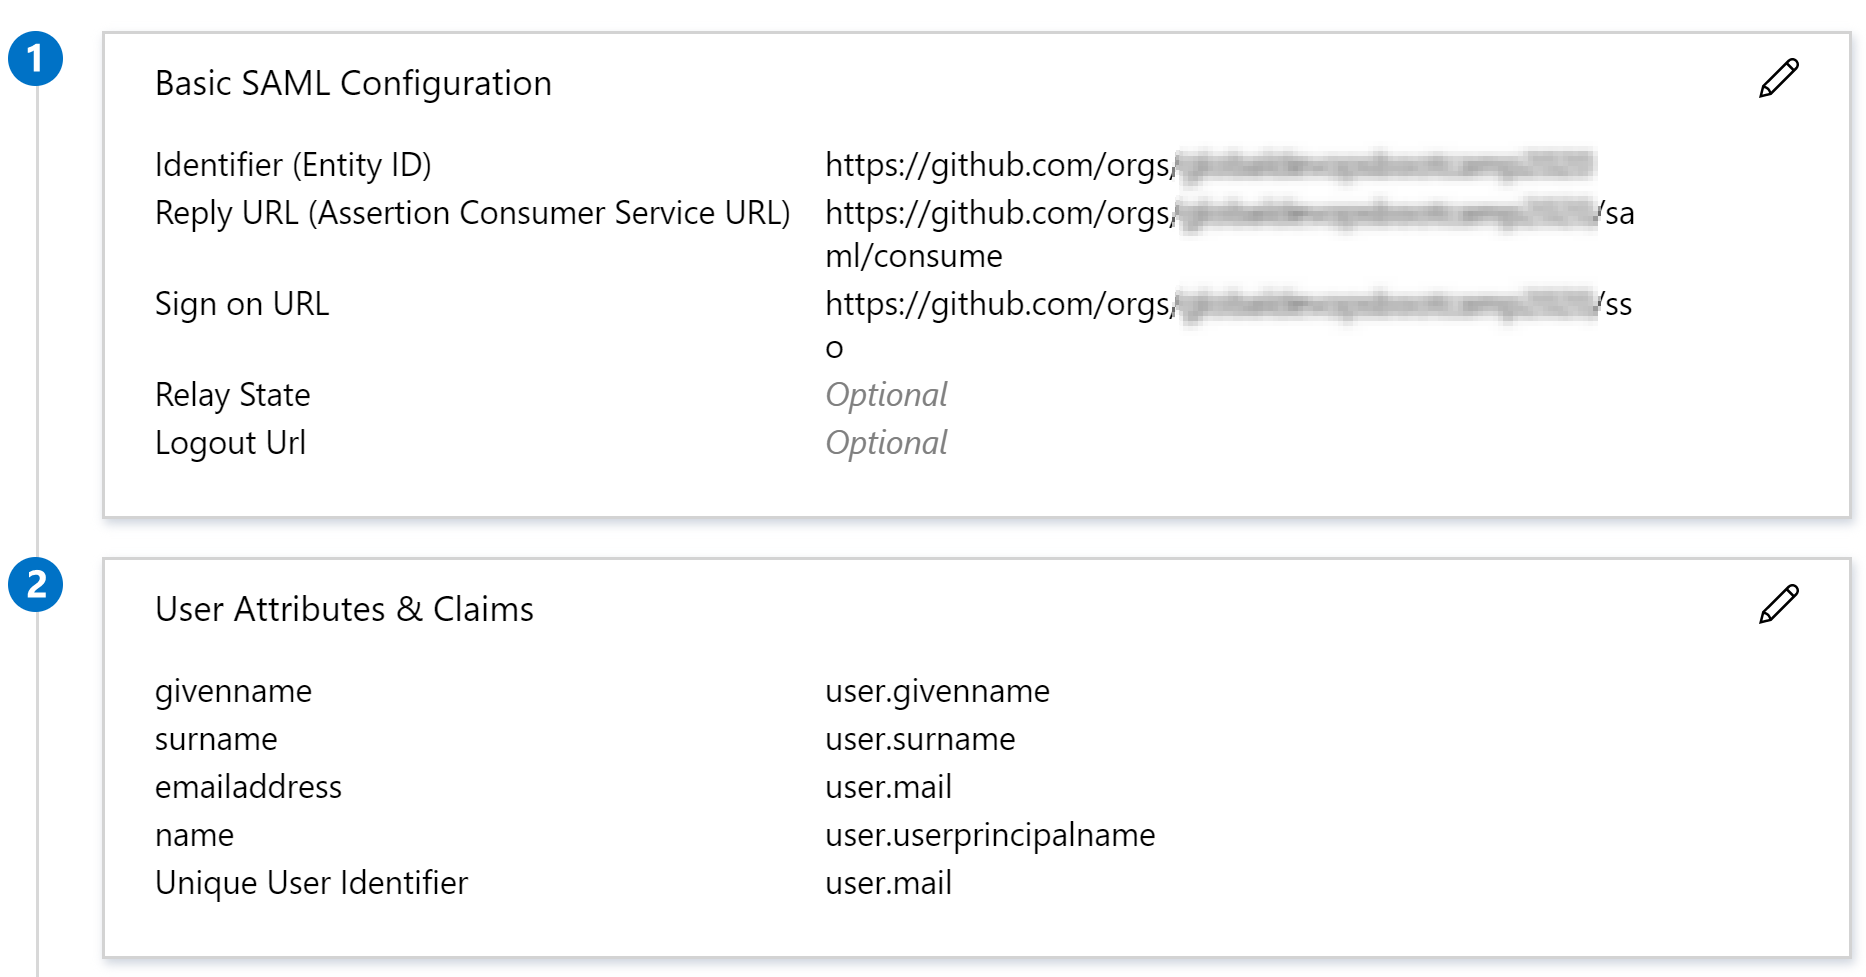
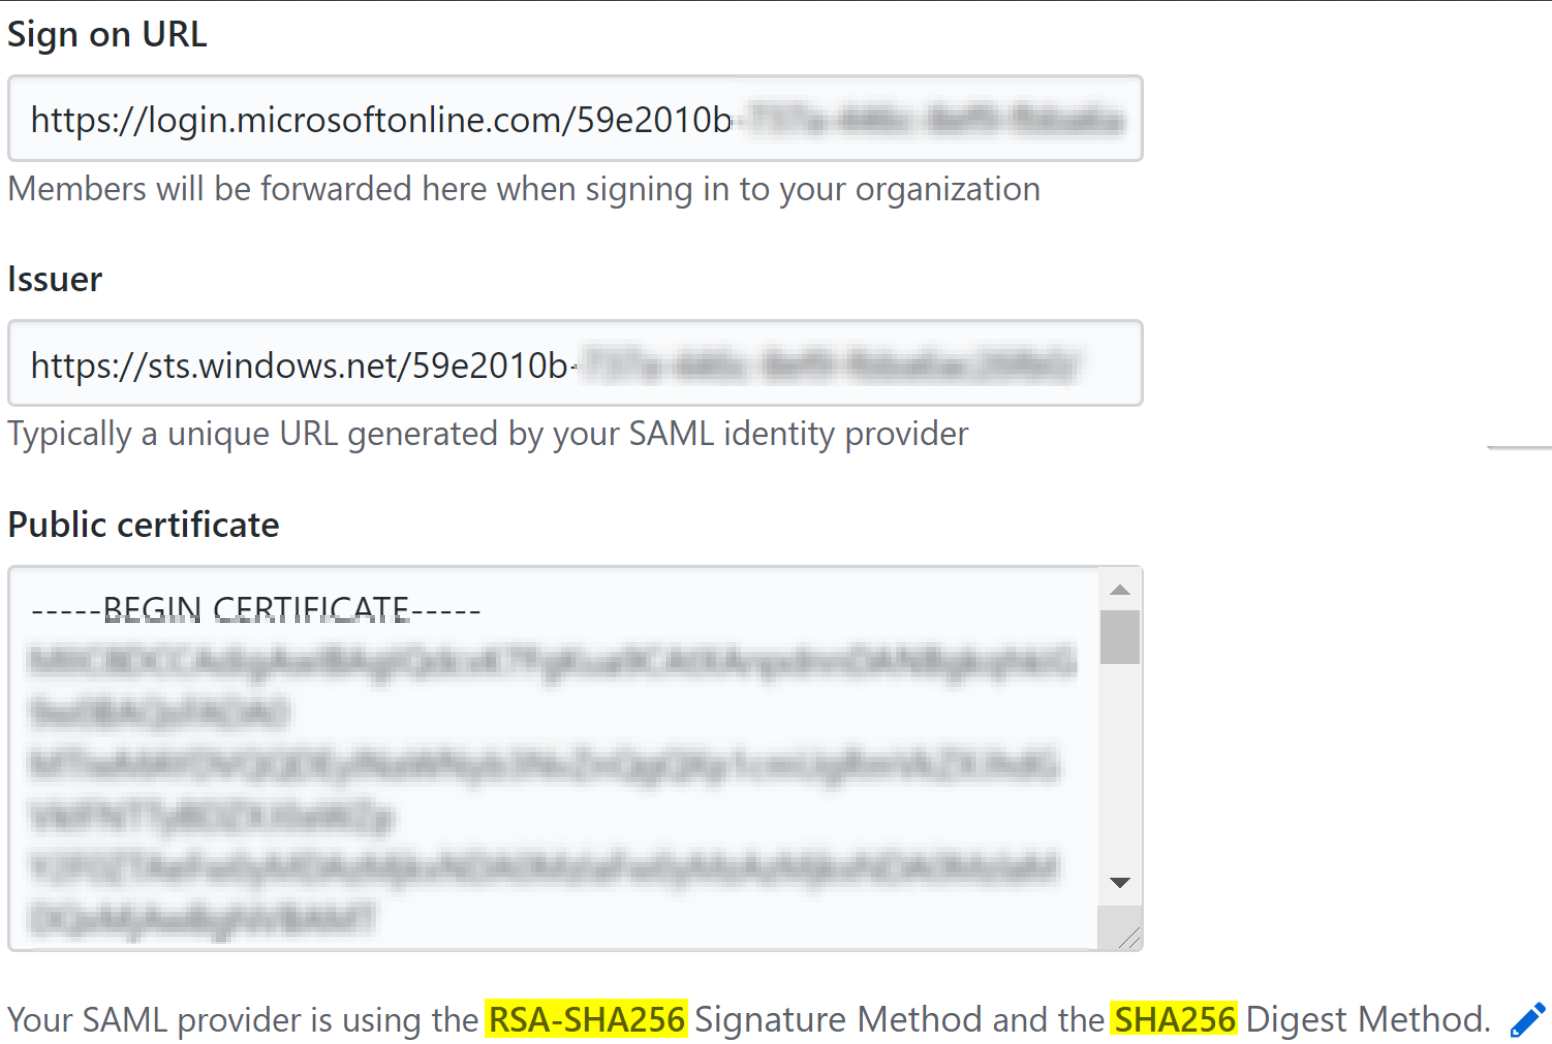
 Photo by Silas Köhler on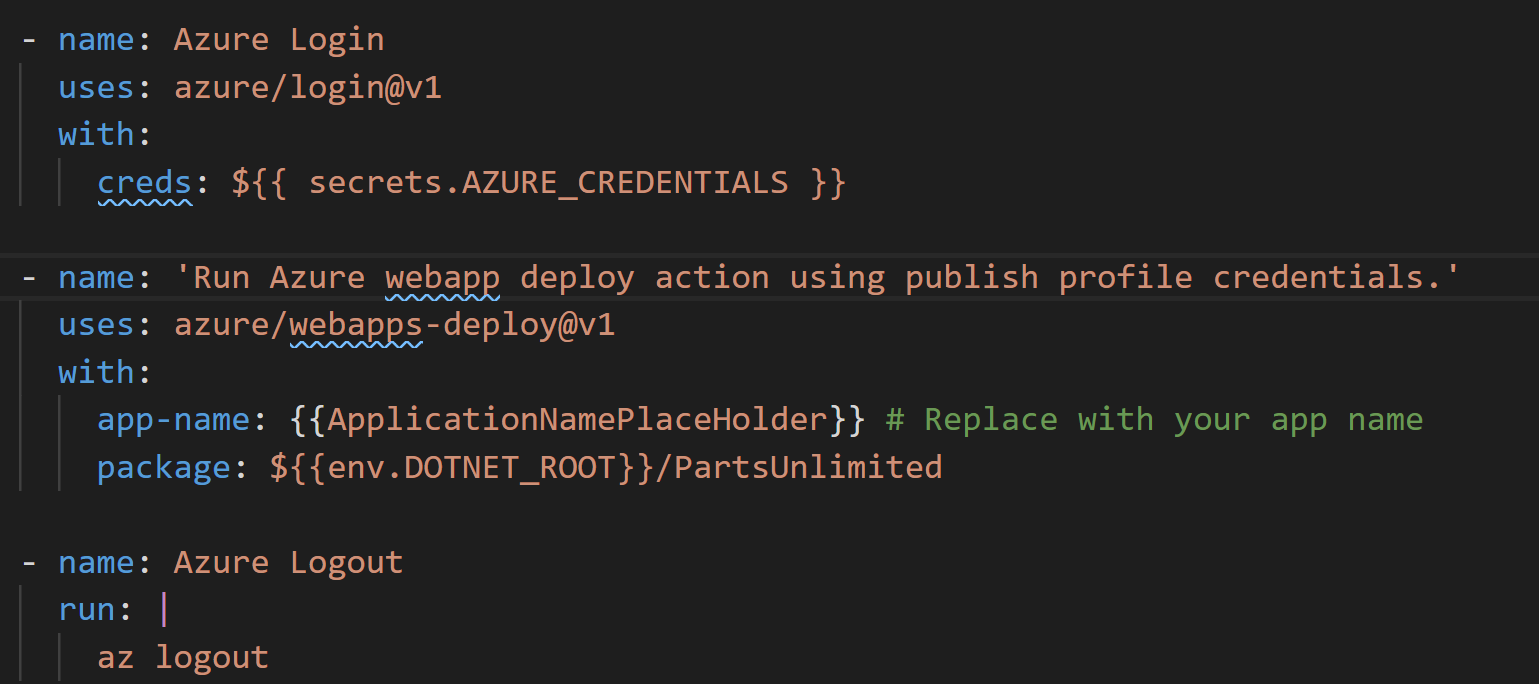
 Photo by Júnior Ferreira on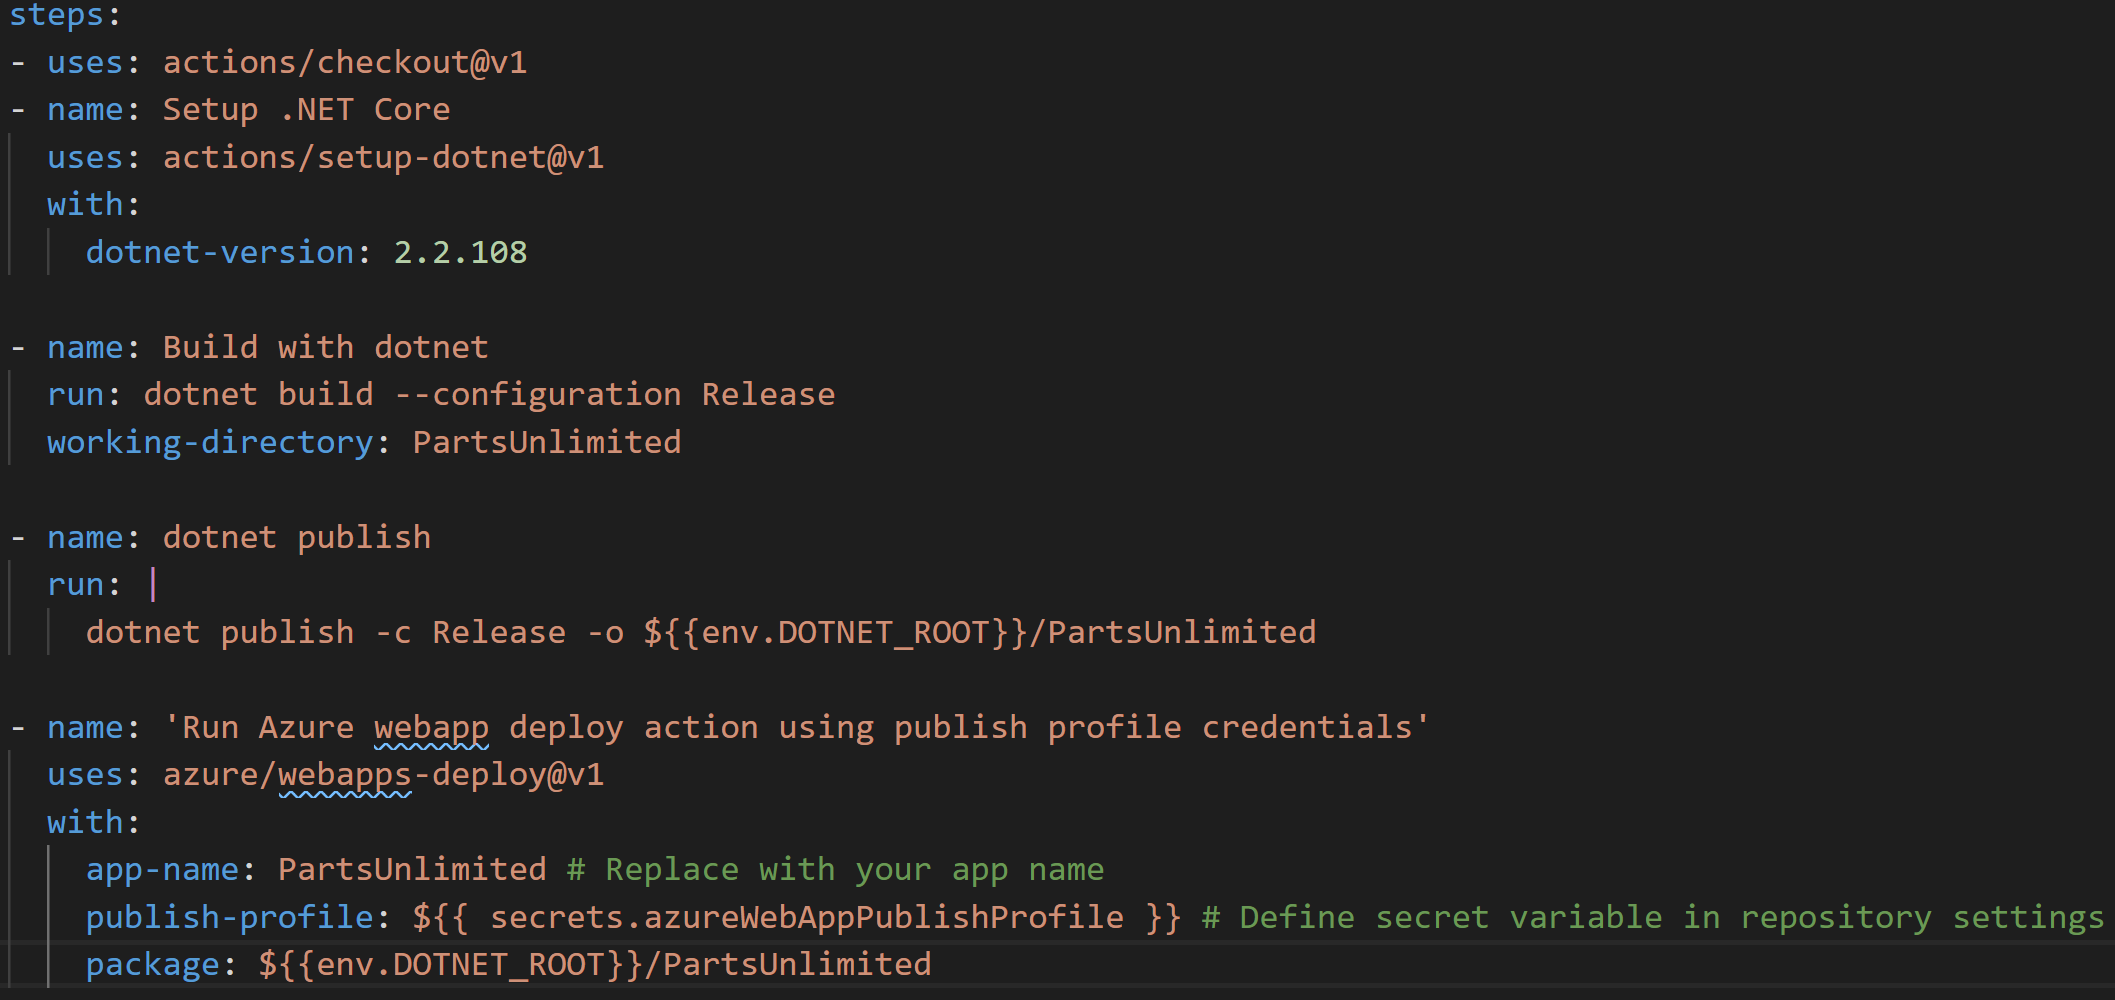
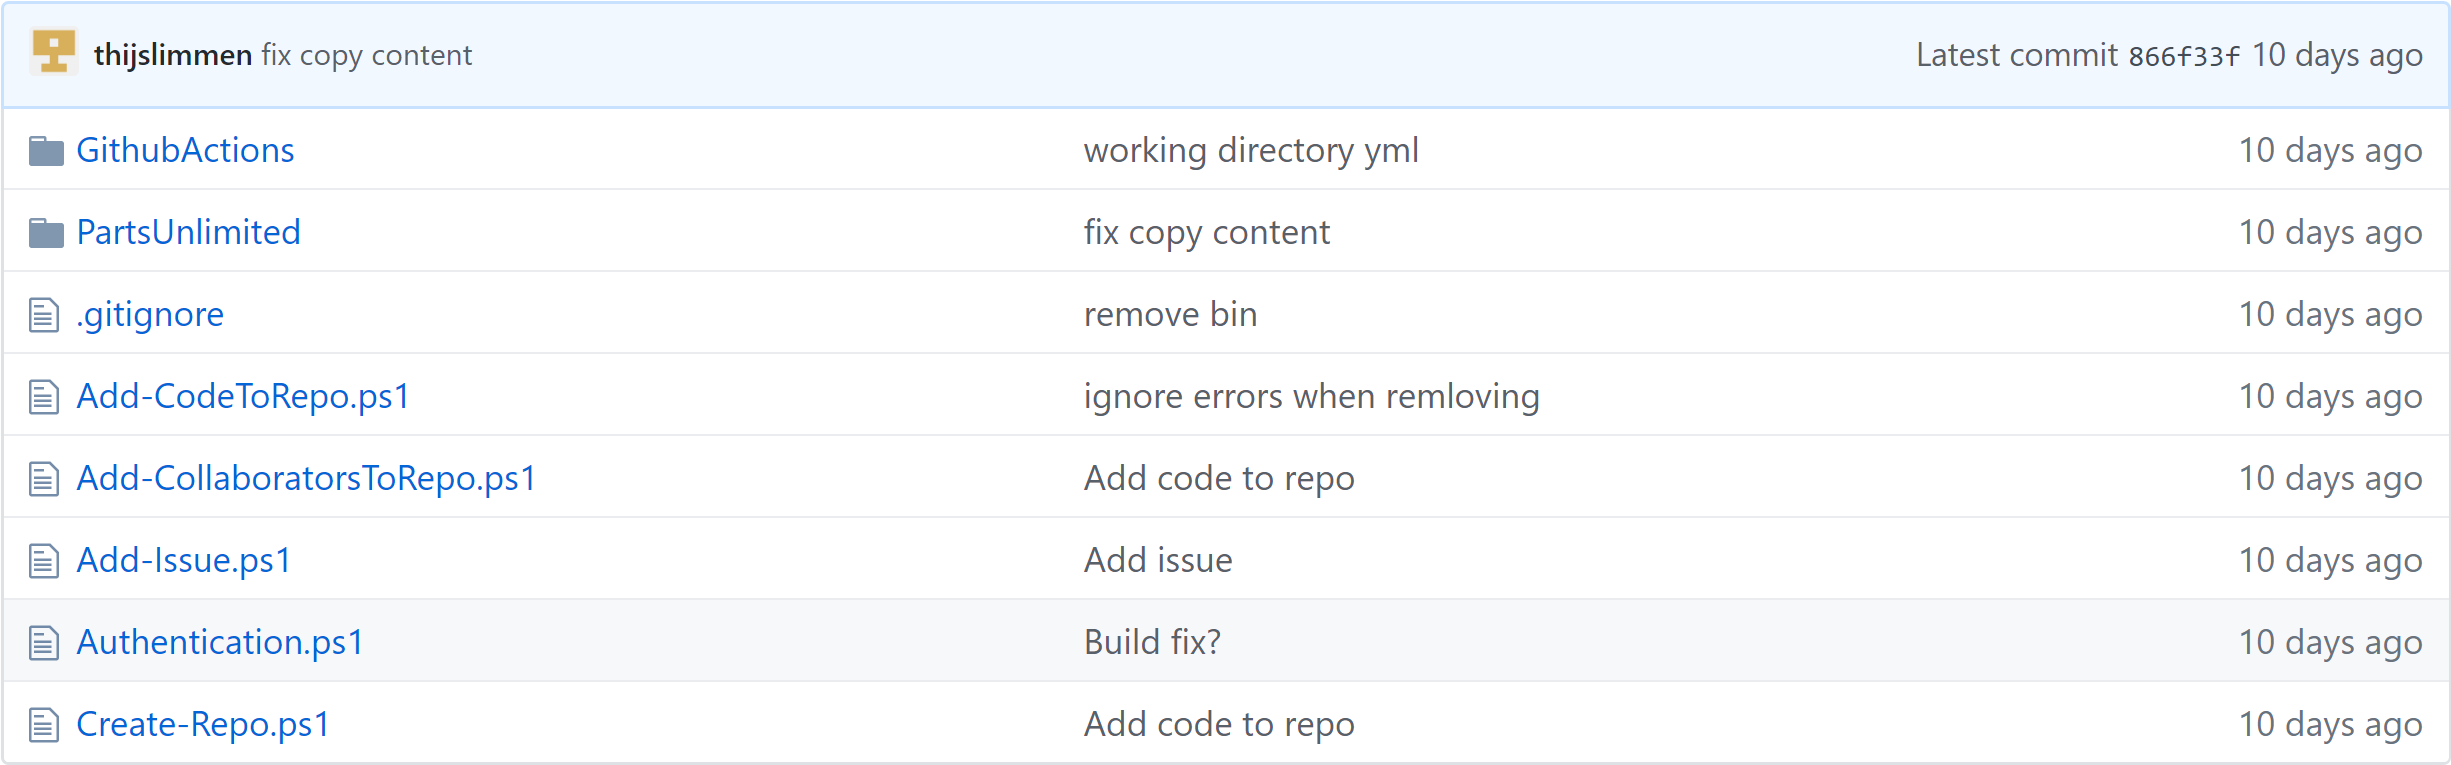
 Photo by Joshua Earle on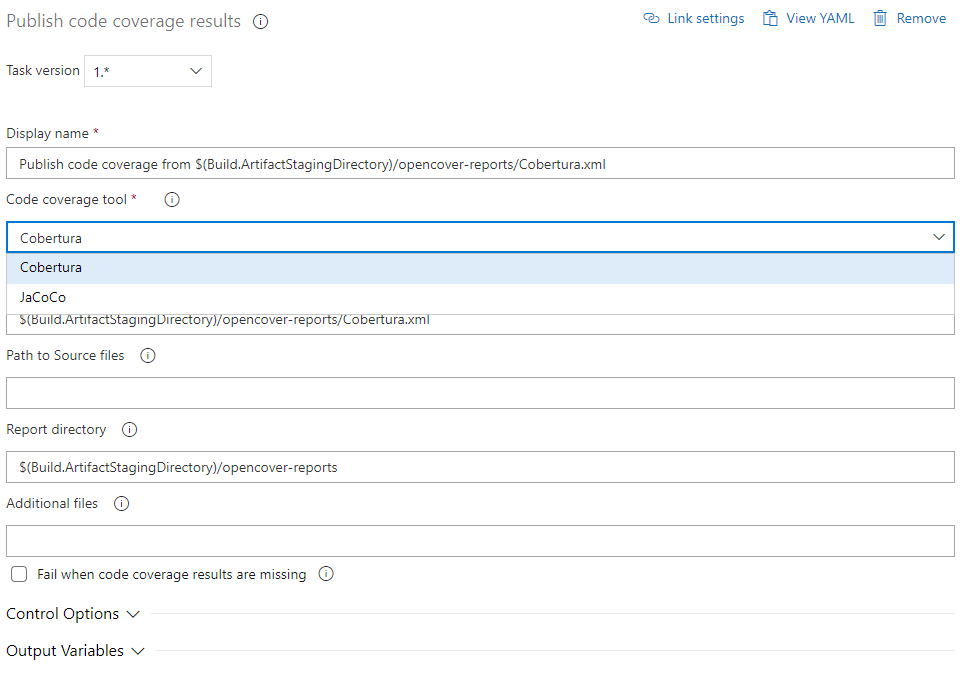
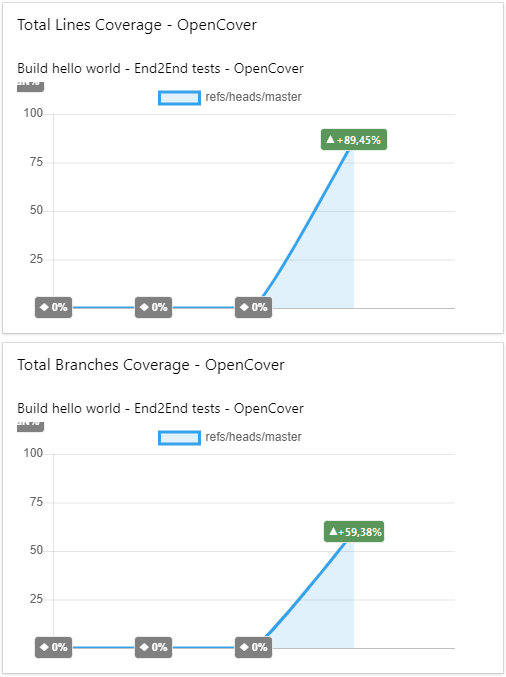
 Photo by Kai Dahms on